How to add a custom syscall to your Linux kernel (5.8.1) in Ubuntu (20.10 Groovy Gorilla)


After a brief review of how system calls work, this tutorial describes step by step how to add your own system call to the kernel and test it. There are many tutorials available so I do a detailed compilation of the steps that worked for me in my specific setup. All the files mentioned in this tutorial are available for your reference in this repo.
Contents
Intro to syscalls
The kernel is the core code of the operating system. Usually when the computer starts the bootloader and the kernel are the first pieces of code to be loaded into the machine. The kernel has control over the entire system, its memory, peripheral devices, processor and so on.
User programs and applications can utilize the resources that the operating system makes available through system calls. As described above, this system calls (syscalls) are listed in the syscall table and are executed in the privileged space of the kernel mode. Some C libraries require interaction with the kernel, thus making use of the kernel's system calls.
With the basics covered we will write a simple function in C that checks if parenthesis and braces are correctly used in an algebraic expression, and add this function to our customized kernel's syscall table.
Hands-on
1. Set your virtual machine
I used Oracle's VirtualBox and this Ubuntu 20.10 machine to set up my environment faster than starting from scratch with an .iso image.
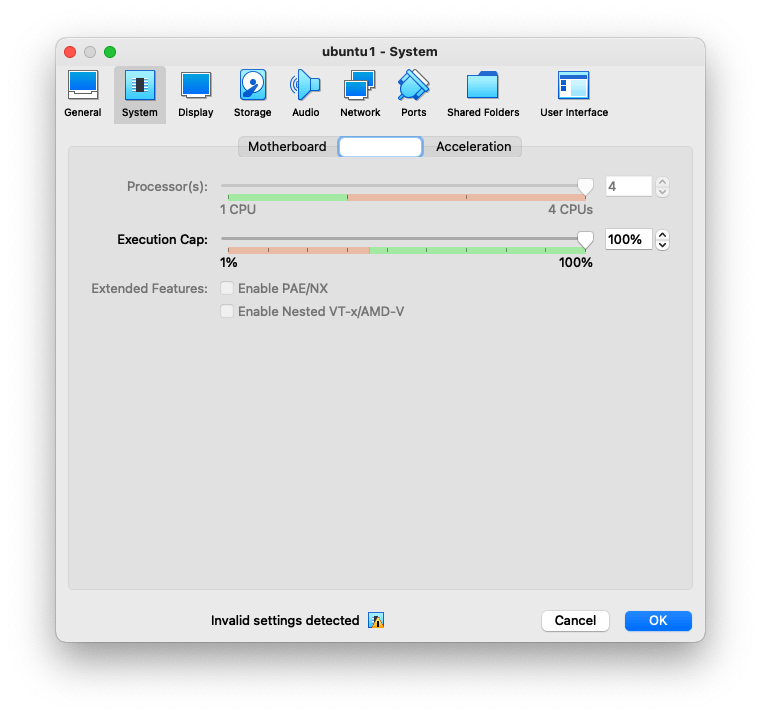
For compiling times to be shorter, I suggest knowing how many logical cores your VM has. Configure your VM's resources while it's powered off and give it as much cores as you wish. As shown in the picture below, I gave mine 4 cores.
Now power on the VM. The default password for the osboxes.org user is also osboxes.org. I prefer to sudo -i instead of sudo every command but you can choose either, just make sure to be safe. Keep everything up do date:
sudo -i
apt update && apt upgrade -y
And install packages useful for kernel compiling:
apt install gcc build-essential libncurses-dev libssl-dev libelf-dev bison flex -y
It is possible that during step 4 you will get compiling errors due to missing packages. If you do, just install them and try again.
I installed Sublime Text but you can use nano, vim or any text editor of your preference. Lastly, clean up for old packages.
apt clean && apt autoremove -y
2. Get the kernel source code
Check your Linux kernel's version using uname -r (mine is 5.8.0). Now search in this site for the .xz file corresponding to the closest version to your kernel and download it to your home ~/ folder. In my case, the closest version was linux-5.8.1.tar.xz, so my command looked like this:
wget -P ~/ https://mirrors.edge.kernel.org/pub/linux/kernel/v5.x/linux-5.8.1.tar.xz
Now unpack the tarball and reboot your VM.
tar -xvf ~/linux-5.8.1.tar.xz -C ~/ && reboot
3. Config the kernel
First sudo -i and change your working directory to the unpacked linux-5.8.1.tar.xz folder.
cd linux-5.8.1.tar.xz
Let's change the kernel's name in its .config file. I will be using Sublime for my text editing (replace subl with nano or vim if you prefer). My kernel's name will be ppp but you can use anything meaningful to your purpose. This is a 1k+ lines file but the CONFIG_LOCALVERSION variable is near the top, under the general configuration.
CONFIG_LOCALVERSION="-ppp"
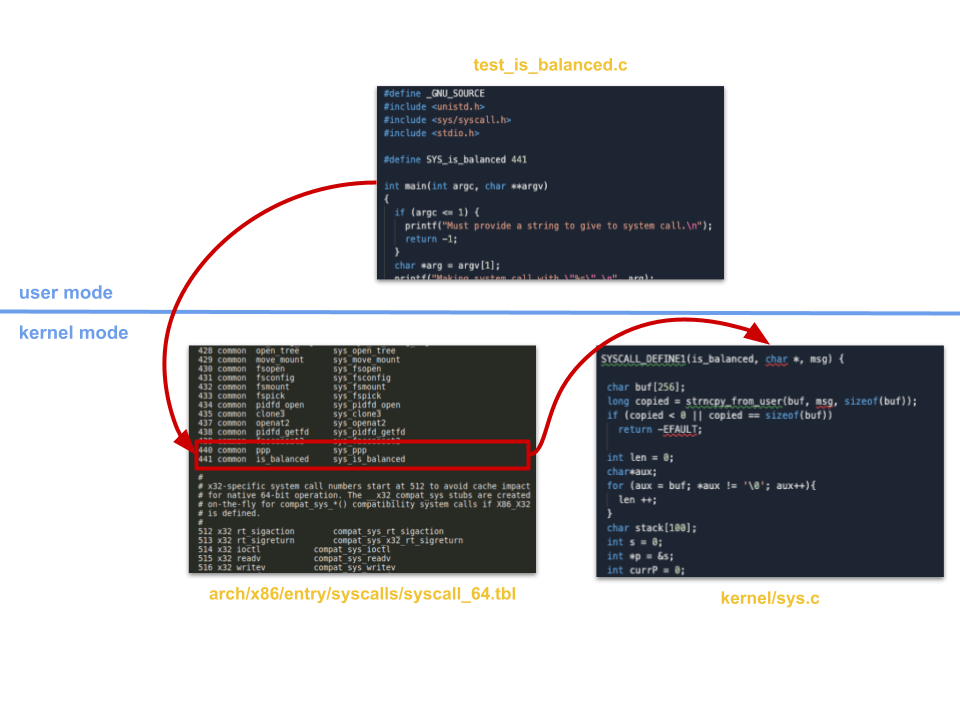
It is time to add our custom syscall to the syscall table. Its location depends on the machine's architecture. For x86_64, run:
subl arch/x86/entry/syscalls/syscall_64.tbl
Now find the line with the last common type syscall. In the line beneath, making sure you are not using any number advised against in the table's comments, add your syscall. In my table the last common syscall was #439, so my syscall_64.tbl file looks something like this after adding two custom syscalls:
# don't use numbers 387 through 423, add new calls after the last
# 'common' entry
435    common        clone3                    sys_clone3
437    common        openat2                sys_openat2
438    common        pidfd_getfd            sys_pidfd_getfd
439    common        faccessat2            sys_faccessat2
440    common         ppp                        sys_ppp
441    common        is_balanced        sys_is_balanced
The ppp syscall is a hello world function I took from this tutorial, while is_balanced checks if a given string has its parenthesis and braces properly opened and closed.
Besides adding the two syscalls to the table we must add a function prototype for each to the header file:
subl include/linux/syscalls.h
At the end of the file, just before #endif we add:
asmlinkage long sys_ppp(void);
asmlinkage long sys_is_balanced(void);
Lastly, we add the syscalls themselves somewhere inside the kernel/sys.c file and we are ready to compile.
SYSCALL_DEFINE1(ppp, char *, msg) {
  char buf[256];
  long copied = strncpy_from_user(buf, msg, sizeof(buf));
  if (copied < 0 || copied == sizeof(buf))
    return -EFAULT;
  printk(KERN_INFO "ppp syscall called with \"%s\"\n", buf);
  return 0;
}


SYSCALL_DEFINE1(is_balanced, char *, msg) {
  char buf[256];
  long copied = strncpy_from_user(buf, msg, sizeof(buf));
  if (copied < 0 || copied == sizeof(buf))
    return -EFAULT;

  int len = 0;
  char*aux;
  for (aux = buf; *aux != '\0'; aux++){
    len ++;
  }
  char stack[100];
  int s = 0;
  int *p = &s;
  int currP = 0;
  int i;
  for (i = 0; i < len; i++) {
    if (buf[i] == '[' || buf[i] == '(') {
      stack[currP] = buf[i];
      currP++;
    }
    if (buf[i] == ']' || buf[i] == ')') {
      currP--;
      char c = stack[currP];
      if (!((buf[i] == ']' && c == '[') || (buf[i] == ')' && c == '('))) {
        return 1;
      }
    }
  }
  if (currP != 0) {
    return 0;
  }
  return 1;
}
4. Compile & install the kernel
First, open the configuration window with the following command:
make menuconfig
Use tab to move between options but make no changes. Keep its default settings, save it and exit.
Now check how many logical cores your VM has:
nproc
Without changing the working directory, create a bash script deploy.sh file.
subl deploy.sh
In my case, I have 4 logical cores. Change all -j4 occurrences accordingly.
#!/usr/bin/bash
# Compile and "deploy" a new custom kernel from source on Ubuntu Linux

# Change this if you'd like. It has no relation
# to the suffix set in the kernel config.
SUFFIX="-ppp"

# This causes the script to exit if an error occurs
set -e

# Compile the kernel
make -j4

# Compile and install modules
make -j4 modules_install

# Install kernel image
make -j4 install

# Update the bootloader
sudo update-grub
Run the script with:
./deploy.sh
It will take some time to compile and install everything. In my case, around 15 minutes. The first time you may run into some compiling errors as mentioned in the step 1. Read the compiling error messages with attention, I solved mine with apt install dwarves.
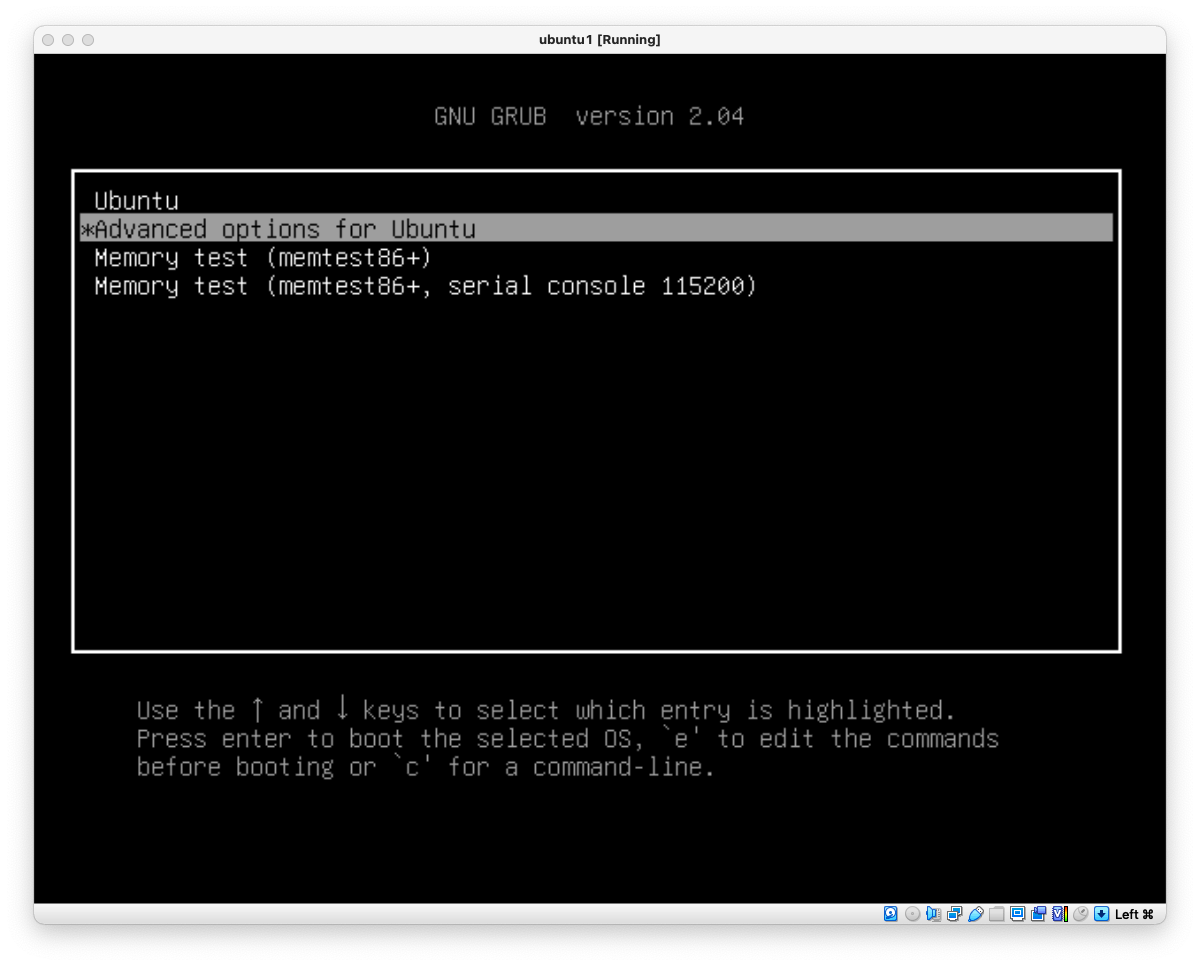
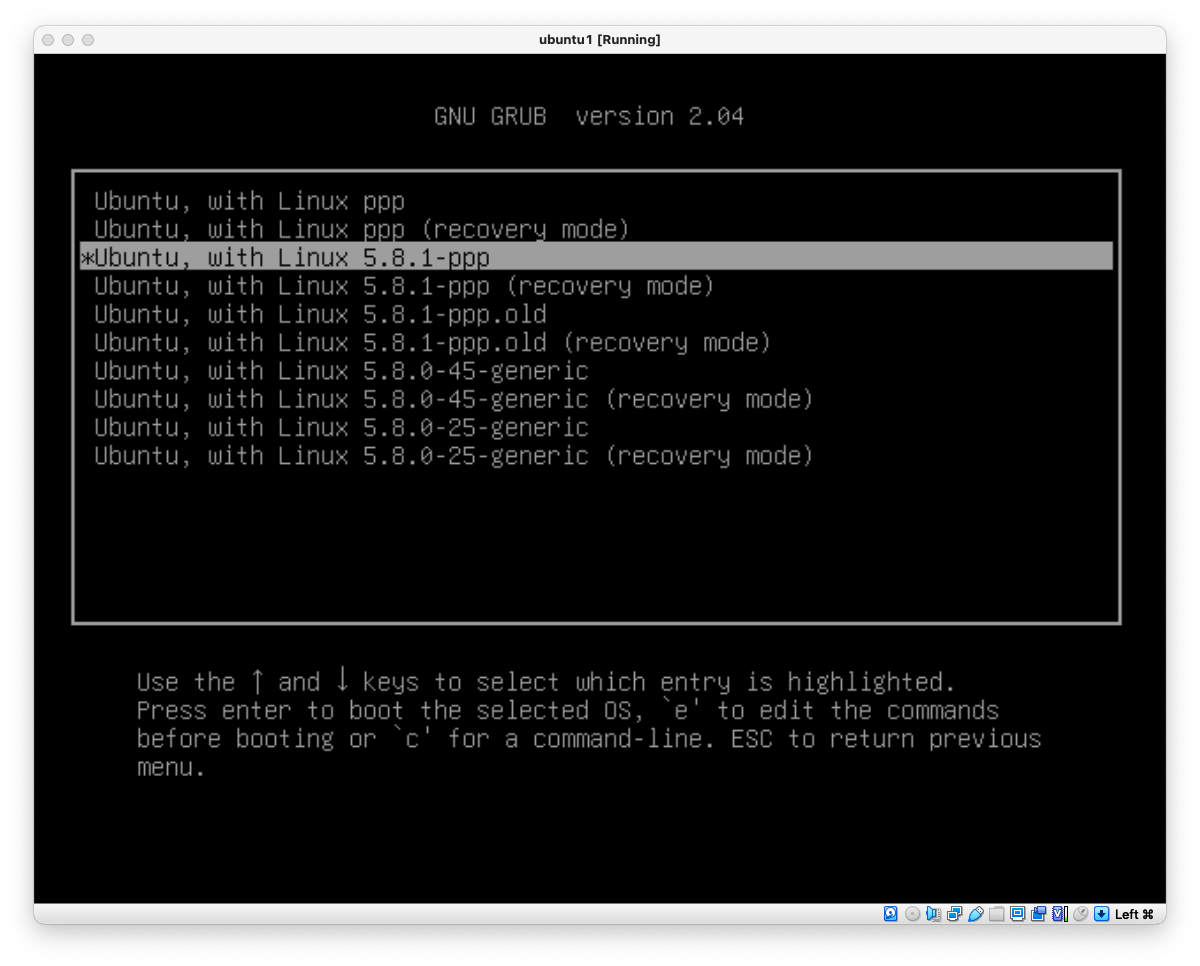
5. Reboot machine with custom kernel
After successfully running the deployment script, reboot the system. Choose advanced options when loading the kernel and choose your custom kernel. In this example it is Linux 5.8.1-ppp.
Check which kernel the operating system is currently using with:
uname -r
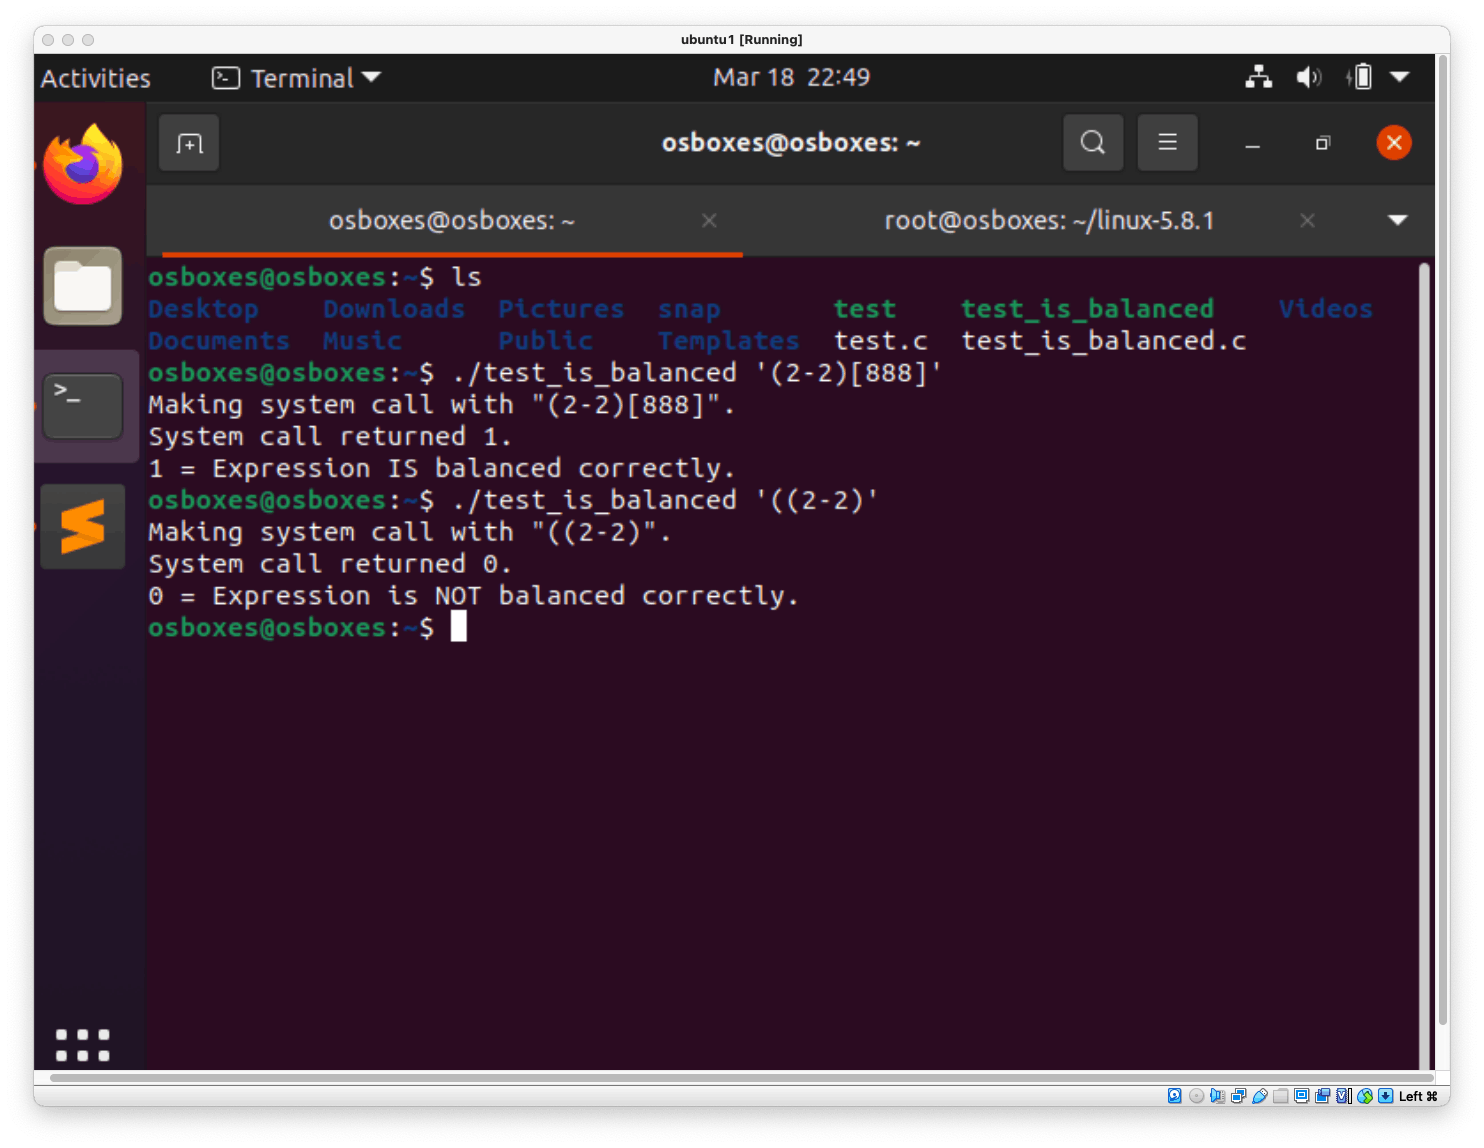
6. Test the custom syscall
Testing the custom syscalls is simple. Create a user program in your home directory or any folder of preference, have it use any of the custom syscalls, compile it using gcc and execute it. To test is_balanced() we will do as follows:
subl test_is_balanced.c
The program looks like this:
/*
 * Test the is_balanced syscall (#441)
 */
#define _GNU_SOURCE
#include <unistd.h>
#include <sys/syscall.h>
#include <stdio.h>

#define SYS_is_balanced 441

int main(int argc, char **argv)
{
  if (argc <= 1) {
    printf("Must provide a string to give to system call.\n");
    return -1;
  }
  char *arg = argv[1];
  printf("Making system call with \"%s\".\n", arg);
  long res = syscall(SYS_is_balanced, arg);
  printf("System call returned %ld.\n", res);
  if(res != 0) {
    printf("1 = Expression IS balanced correctly.\n");
  } else {
    printf("0 = Expression is NOT balanced correctly.\n");
  }
  return res;
}
Compile it:
gcc -o test_is_balanced test_is_balanced.c
Execute it:
./test_is_balanced '((2-2))('
./test_is_balanced '((2-2*3))([['
./test_is_balanced '[(6*3)-(66/6)]'
Done! You should get the following outputs:
Hope this tutorial helps you customizing your kernel and learning more about operating systems. I recommend you check the references for some great support on the topic. Happy coding 🙂
References
- 🧠 Very educational and complete tutorial (uses Arch VM instead of Ubuntu), delves into the conceptual foundations behind each step. Write a System Call, by Stephen Brennan (2016). brennan.io/2016/11/14/kernel-dev-ep3
- 🔥 Recent and simple tutorial with good references and tips. Adding A System Call To The Linux Kernel (5.8.1) In Ubuntu (20.04 LTS), by Jihan Jasper Al-rashid (2020). dev.to/jasper/adding-a-system-call-to-the-l..
- Adding a Hello World System Call to Linux Kernel, by Anubhav Shrimal (2018). medium.com/anubhav-shrimal/adding-a-hello-w..